
DIY Facemask sewing pattern with filter pocket and nose wire (without elastic!)
Why make your own DIY face mask:
It’s official! The hottest fashion accessory of 2020 is……. cloth face masks?
The CDC is now recommending that all Americans wear face covering when we leave our homes.
Here’s some important things to keep in mind when wearing a DIY facemask:

Make your own DIY facemask or purchase one of mine.
🦠 Face masks don’t replace physical distancing. We still need to stand 6 ft apart.
💦 Face masks help by creating a physical barrier to stop water droplets (aka your spit and breath!) from contacting other people or surfaces.
🧽 Two layers of tightly woven fabric like quilters cotton is more effective as a filter than knit fabrics.
🛒 Its now recommended that we wear face masks anytime we go out where we will touch surfaces other people touch.
neighborhood mail box
grocery store
gas station
post office
bank (but really, just do that online 🤷🏻♀️)
you get the idea 😘
What does a DIY facemask need to have?
Tight weave cotton fabric
You can use a scarf, bandanna, old t-shirt, tea towel, or scrap fabric. Just make sure it is tightly woven. When you hold the fabric up to the light you shouldn’t be able to see much through it. For example, linen fabric is too airy to be a good filter. The CDC also specifically calls out cotton as opposed to other fabric materials.
Cover whole nose, mouth, and chin
The facemask should cover your nose and go down past your chin. It should extend across your cheeks. Your mask should have a decent fit over your face. Tight enough to be effective but loose enough to be comfortable.
Good fit
Elastic straps help standard surgical masks fit to any size face. If you’re not using elastic (because it’s sold out everywhere!) you can use ribbon to make the mask adjustable.
Nose Wire
The CDC does not require a nose wire on face masks, but if you wear glasses they’re a must! Having a wire to adjust the top of your mask will stop your breath from fogging up your glasses.
Two layers of fabric
The purpose is to filter air and be a physical barrier to stop your spit and breath from touching other people or surfaces. Obviously two layers are more effective than one and the CDC does recommend two layers of fabric. You can also include a filter pocket to insert a coffee filter, paper towel, or piece of flannel to increase filter efficiency.
If you don’t want to make your own, you can buy one of mine and support 8 amazing women in Austin, TX helping me sew them!
or scroll down for the DIY pattern and make your own!
Step by Step DIY Facemask with filter pocket and nose wire
Supplies needed:
16x9 inch fabric rectangle (adult size)
48 inches of ribbon, yarn, or string (will be cut in two pieces)
A twist tie or 6 inch piece of pipe cleaner
Iron and ironing board
sewing supplies
Instructions:

1) Cut your ribbon so that you have two 21 inch pieces, for the straps, and two 3 inch pieces, for the loops.

2) Place the rectangle long ways on your ironing board. Fold the corners in and iron down. This will make a clean edge on the top of the mask later on.

3) Fold the top of the mask down 1/4 inch and again 1/2 inch. Iron down the seam.
4 )Fold the bottom of the mask up 1/4 inch and again 1/4 inch. Iron down the seam.

5) Move to the sewing machine. Sew down the bottom seam of the mask.
6) Place the top seam of the mask on your machine and insert one side of the ribbon about 1 inch under the seam about to be sewn. Sew across the top seam. When you reach the end, put the second piece of ribbon under the seam and sew closed. Backstitch at the top and bottom to give extra strength to the straps.

7) Move back to the ironing board. Place the fabric wrong side down. Fold the bottom of the mask up so that the fabric is right side to right side. Line up the bottom seam just underneath the top seam. Iron the bottom flat. Iron will help keep it in place and will give you a guide for where you need to place the bottom loops.

8) Insert the pipe cleaner or twist tie in the top seam and push it to the center of the pocket.

9) Move to the sewing machine. Sew from the top of the mask down to the bottom. Before reaching the bottom, fold your 3 inch piece of ribbon in half to form a loop. Insert the loop so that the cut ends line up with the edge of your seam. Sew down and backstitch over the ribbon. Repeat on the other side. (NOTE: if you want to keep the top seam open so that the pipe cleaner can be removed, simply start your stitch under the top seam.

10) Move to the ironing board. Trim off the excess seam. The corner we folded in the beginning should extend down past the top of the pocket so that no raw edges are exposed. Flip the mask right side out and iron down all the sides. You now have a pocket!
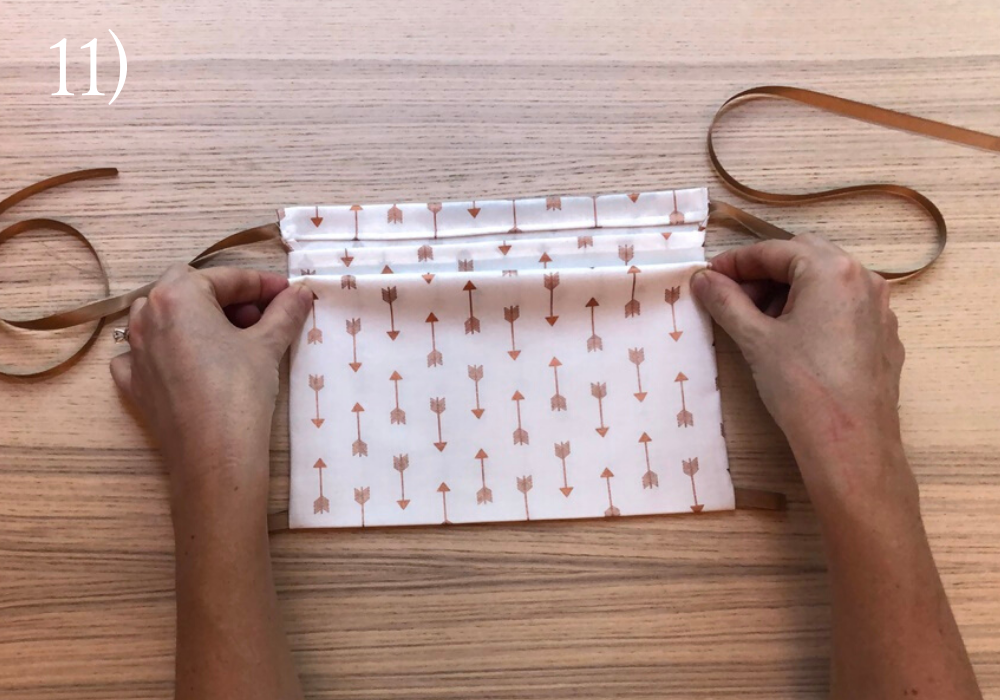
11) Place the mask with the back side of the mask facing up. Pinch the fabric about 1 inch below the top of the pocket. Fold the fabric up to make a pleat. Repeat this to make three pleats. The top of each pleat should land just below the pleat above it so that the fabric lies flat and isn’t too thick to sew.

12) Iron the front and back of the mask to press the pleats well.

13) Move to the sewing machine. Starting at the top of the mask, sew down the sides to secure the pleats.


14) Optional: Add chin darts to make the mask a bit more comfortable. Mark two locations on the bottom of the mask, about two inches apart. Fold the mask so that the front is inside and the back is exposed. Line up the bottom edge of the mask and sew a line about 1/2 inch from the corner to make a triangle. Repeat this on the second location. This will make two darts that go underneath your chin so the make forms to your face.

How to wear the DIY facemask:
Insert filter media into the pocket, if using. (Coffee filter, paper towel, etc.)
Thread the straps through the bottom loops.
Place the straps over your ears.
Pull the straps to tighten and tie at the back of your neck.
Use your fingers to form the pipe cleaner around your nose.
Breathe normally.


